
- About the Snack Delivery Worksheet in the Touch App
- Tutorial Video - Snack Delivery Worksheet in the Touch App (1:23)
- Running the Snack Delivery Worksheet
- Where is the Info Pulled from for the Snack Delivery Worksheet?
- Default Settings for the Snack Delivery Worksheet
- Sorting the Residence Areas on the Initial Setup Screen
- Automatically Generating Snack Delivery Worksheet on Daily Basis (i.e., Archiving Report)
- FAQs
- Printable One-Page Quick Reference Guide
About the Snack Delivery Worksheet in the Touch App
The snack delivery worksheet lists the snacks to be served for residents or patients. This worksheet is designed to be used during “snack pass” to inform you of what snacks to deliver.
The worksheet lists snacks for each person based on their diet type, their allergens, and their personal menu customizations. Any service snack notes that were entered for a person via their profile are also included.
Tutorial Video - Snack Delivery Worksheet in the Touch App (1:23)
Running the Snack Delivery Worksheet
Under People Reports, tap Snack Delivery Worksheet (first screenshot below). The Snack Delivery Worksheet screen appears (second screenshot below).
- Select the date.
- Select the snack time (Snack AM, Snack PM, or Snack HS).
- Select from the following options:
- Include Date of Birth - includes the person’s date of birth.
- Include Daily Notes - prints any service snack notes that were entered for a person via their profile. It is recommended to include the notes in the worksheet.
- All Choices - snacks will be listed under their assigned choice headings (choice 1, choice 2). The All Choices option is ideal for the select service (advanced ordering or table select) in which snack options are chosen by a resident. If All Choices is not selected, then only choice 1 snacks will be listed without a choice heading, which is ideal for the non-select service where snacks are not chosen by a resident.
- Select the residence locations to run the worksheet for. Note: The order in which the residence areas are listed on the initial setup screen can be adjusted in the MealSuite core system; see Sorting the Residence Areas on the Initial Setup Screen below for instructions.
- Tap the Create Report button to generate the worksheet.
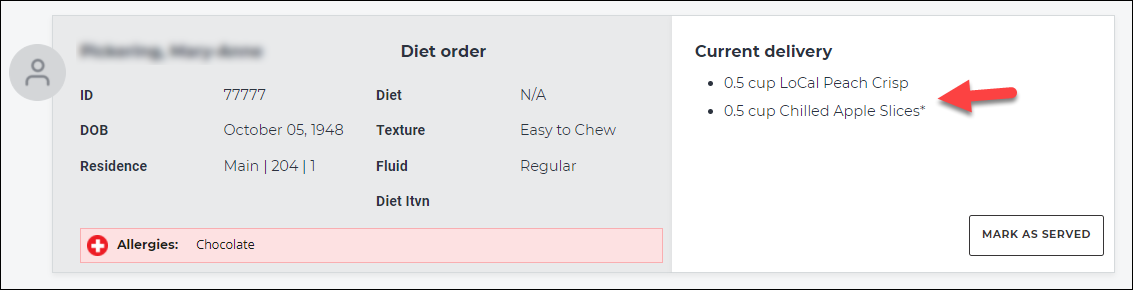
Layout
Allergens are highlighted in red.
A menu item marked with an asterisk is pulled from the scheduled snack menu. A menu item without an asterisk is pulled from the person's personal menu.
Sorting the Resident/Patient List in the Desired Delivery Sequence
To sort the resident/patient list in the desired delivery sequence for snacks, tap Options and select one of the following sorting options:
- Building - sorts the report according to the alphabetical/numerical order of residence areas, in either ascending or descending order.
-
Patient Name - sorts residents/patients alphabetically by their last name, in either ascending or descending order.
Filtering
The Options tool allows you to filter resident/patients displayed onscreen according to their residence areas.
Increasing or Decreasing Size of Onscreen Content
Tap the magnifying glasses to increase or decrease the size of the onscreen content.
Marking Item as Served
Tap the Mark As Served button when the resident has been served.
When Mark as Served is tapped, the status reads Served with the option to Undo.
Where is the Info Pulled from for the Snack Delivery Worksheet?
The people to be included in the worksheet are pulled from their assigned residence areas that you select when running the worksheet (instructions above).
The snacks listed in the worksheet for a person come from a scheduled snack menu that shares the same menu service location of the person's residence area enabled as a dining area (by default all residence areas are enabled as a dining area to allow for in-room delivery).
In addition, any items (i.e., personal item, specific substitute or fallback substitute) that have been added to a person's personal menu in a snack time (AM, PM, HS) are also listed in the worksheet.
Default Settings for the Snack Delivery Worksheet
Certain settings can be set by default when the Snack Delivery Worksheet is run by the Touch app user. This is configured in the Core system as follows:
- From the left navigation sidebar, select Tools & Setup > Touch Report Presets. The Report Presets screen appears.
- In the Snack Report section, you have the following options:
- All choices - snacks will be listed under their assigned choice headings (choice 1, choice 2). The All choices option is ideal for the select service (advanced ordering or instant ordering) in which snack options are chosen by a resident. If All choices is not selected, then only choice 1 snacks will be listed without a choice heading, which is ideal for the non-select service where snacks are not chosen by a resident.
- Include daily notes - prints any service snack notes that were entered for a person via their profile. It is recommended to include the notes in the worksheet.
-
Include date of birth - includes the person’s date of birth.
- Click the Update Touch Report Preset button to apply your changes.
Sorting the Residence Areas on the Initial Setup Screen
The order in which the residence areas are listed on the initial setup screen can be adjusted. This adjustment is performed in the MealSuite core system as follows.
- Open the Facility Builder screen (Tools & Setup > Facility Builder).
- Click the Delivery Sequence tab.
- Expand the sections as needed. The building and residence area levels are what is represented on a Touch report setup screen. Sort the buildings and residence areas to their desired order by clicking and holding a level, and then dragging and dropping it to the desired spot.
Note that the above steps only change the order of residence areas on the initial setup screen, and do not affect how the residents are sorted in the actual report.
Automatically Generating Snack Delivery Worksheet on Daily Basis (i.e., Archiving Report)
The system allows for the Touch app Snack Delivery Worksheet to be automatically generated for a snack service at a designated time each day.
In the case of auto-generating the Snack Delivery Worksheet, the snacks to be served to your resident/patients are captured at the designated time to ensure historical accuracy regardless of subsequent census/menu changes. In addition, if the Snack Delivery Worksheet had been manually generated and items marked as served, then these served items are also captured in the report.
Auto-generated reports are archived in the system and are retrieved for viewing in the Touch app via Service Tools > Archived Reports (see below for steps).
To set up the Snack Delivery Worksheet to be auto-generated and archived, complete the following steps:
- In the Touch Admin software, select Report Archiver from the left navigation pane. The Report Archiver screen appears.
- Click the New button. The New Report Archive Setting screen appears.
- From the Meal field, select the snack service (snack am, snack pm, snack hs) that you want to capture.
- From the Run At time fields, select the daily time the report is to run.
- Select the Snack Delivery Report check box.
- Click the Save button.
Viewing an Archived Report
As noted, when a report is auto-generated on a daily basis, it can be retrieved for viewing in the Touch app. To do so, complete the following steps:
- Log in to the Touch App.
- At the bottom right, tap Settings and select Archived Reports The reports screen appears for the current date (second screenshot below).
- To open an archived report, tap its name.
FAQs
For my snack report, a snack item is not printing/displaying?
If a snack is not printing on the Snack Delivery Worksheet run from the Touch app, it could be that the snack is in a choice setting on the menu that is not choice 1 in the MealSuite core system (first screenshot below). Therefore when running the Snack Delivery Worksheet in the Touch app, ensure that the All Choices option is selected (second screenshot below).
Printable One-Page Quick Reference Guide
Click the attachment below to download a one-page printable guide for the Touch Snack Delivery Worksheet.